This article explains how you can share measured values from a measurement with a customer. It takes into account that the customer only has access to their measurements and not to older or more recent measurements.
You can make 3 restrictions:
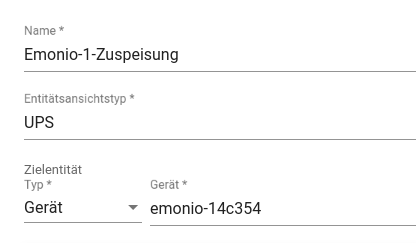
- From which measuring device values can be viewed (e.g. emonio-12345 and emonio-54321)
- Which measured values can be viewed (e.g. voltage, current and power)
- The period for which the data can be viewed (e.g. from 1.8.2023 10:00 to 31.8.2023 10:00)
Read below to find out how this works...
¶ Create customers and users
First, create a new customer and add a user. This allows the customer to log in individually later.
First create a new customer, you can read more about this in the corresponding instructions.
Then add a new user; it is important that the user is created in the customer's "Customer Users" user group.
| Open the user management of the newly created customer by clicking on the "Individual person" icon |
 |
| Open the "Customer Users" user group by clicking on the corresponding line. |
 |
| Click on the "+" symbol in the top right-hand corner to add a new user |
 |
|
Fill in the fields
Click on "Add" to create the user. If you have chosen the first activation method, you will be shown the activation link, send this to your customer. The customer can use the link to assign a password for his access. |
 |
¶ Create entity view
Next, create an entity view for the customer. This controls access to the data.
To do this, navigate back to your customer overview and select your customer by clicking on the corresponding line. A menu opens on the right, where you select the "Manage entity view groups" item.

Select the "All" group by clicking on the line.
Now add a new entity view by clicking on the "+" symbol.

A dialog opens which allows you to create and configure a new entity view.
The individual configuration fields are explained below; all fields can also be edited retrospectively.
|
 |
|
|
When transferring properties, you specify which properties are to be shared. We recommend selecting the following "Client properties": |
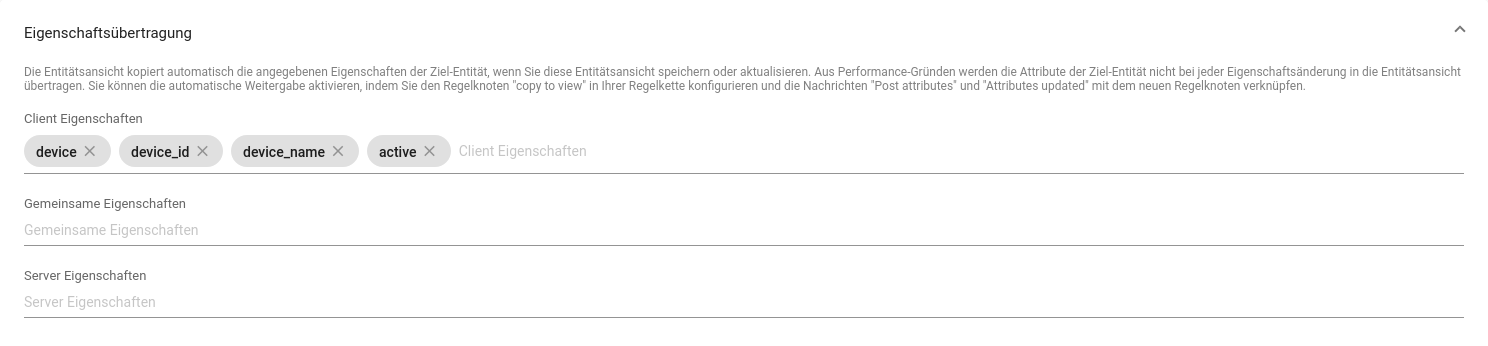 |
|
|
For the time series data, you specify which time series data is to be shared.the values that can be selected here appear in the various graphs.the customer will later only have access to the data entered here. In the example on the right, values for the work( |
 |
|
|
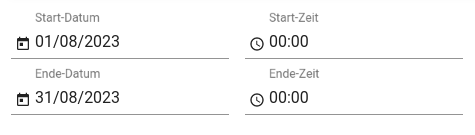
In the date section, select the period for which the data is to be shared and the customer will later only have access to the configured values in the period from the start date to the end date, thus ensuring that the customer only has access to measured values from their measurement. In the example on the right, all values from the month of August are divided, excluding the measured values from 31.8. |
 |
|
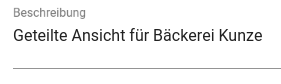
| You can optionally add a description, this is only for a better overview. |
 |
|
Then press "Add" at the bottom right to save the entity view.
¶ Create dashboard
Create a new dashboard for the customer; it is important that the entity view is set as the data source for the entity alias names and not the device.
With this ready-made dashboard, you already have a good basis. Click on the link to download the JSON file and add it to the customer's dashboard.
To do this, navigate back to your customer overview and select your customer by clicking on the corresponding line.
A menu will open on the right, select "Manage dashboard groups".

Select the "All" group by clicking on the line.
Now import the downloaded JSON file by clicking on the "⇑" symbol.

Use the dialog to select the downloaded JSON file on your computer to import it.

Click on "Import" to add the dashboard to the customer.
The customer can now open the dashboard and see the shared data.